Making the Most Out of Your Yubikey 4
An update is coming soon with the new Yubikey 5 features
I have used YubiKey for years now. I had a battle-proven Yubikey NEO for the last 5 years on my keyring, and honestly, after rain, mud, falls, dog bites and washing machines, it was impeccable, if a bit worn out. Those things are nearly indestructible.
I recently got a new one in a conference, along with a YubiKey 4C, and decided to give the old one to a friend just for the sake of passing it along.
I decided to use the 4C as my main YubiKey and the new NEO as a backup.
Another friend of mine attended the same conference and got the same YubiKey, and has been bugging me to write a guide on how I use my device. Guess he got it.
YubiKey NEO x YubiKey 4C
Before we begin, let’s discuss the differences between both versions of YubiKey I’m using and why I choose one over another to be my primary.
Both versions supports:
- Yubico’s OTP (like a HOTP validated by Yubico’s servers)
- 2 configuration slots (going to talk more about that later on)
- OATH-HOTP
- Static Password
- Challenge-Response
- U2F
- PIV
- OpenPGP SmartCard
YubiKey NEO main difference is the NFC support, which allows it to be used with both Android and iOS. Also, the OpenPGP applet supports keys up to 2048 bits long. It’s connection is regular USB.
YubiKey 4C, on the other hand, has no NFC support, but allows for OpenPGP keys up to 4096 bits long. It’s connection is USB C, and has a smaller form factor.
I decided to use the 4C as the primary due to it’s key length and the fact that I don’t really use NFC (plus, my Pixel phone has an USB C connection and it works great with the OpenKeyChain app, which also supports NFC). The smaller form factor is also a nice plus since I already have a pretty bulky keychain because of my Ledger Nano.
Along with that, having a backup that supports more connections than the default, and a more common USB port, allows for more flexibility on an emergency situation.
I’ll add a Backup section everywhere it’s applicable so you know what you should do with your second YubiKey, if you decided to have one. I highly recommend you do, to avoid getting locked out of your stuff.
U2F
U2F is an open authentication standard that enables internet users to securely access any number of online services with one single security key instantly and with no drivers or client software needed.
Imagine it like a hardware based second factor. Now, this is not meant to be used as the single authentication factor, unlike it’s spirit successor FIDO 2, which is meant to replace passwords entirely.
Most major services today support U2F and are committed to support FIDO 2 when that comes out.
I have it enabled in Facebook, G Suite, GitHub, GitLab, DropBox, BitBucket and some others I don’t remember.
You can get a list of services that support U2F on Yubico’s website, but it’s by no means an exhaustive list. Check out the services you use to see if you can enable U2F.
Google Chrome is the only browser to fully support it, but you can enable experimental support on Firefox by setting **security.webauth.u2f **to true in about:config. I use it, and it worked flawlessly so far.
Backup: You can add as many hardware keys as you like with U2F, so just make sure you have both your keys in hand when you enable it, and you can add both.
Check some screenshots below of U2F on GitHub.
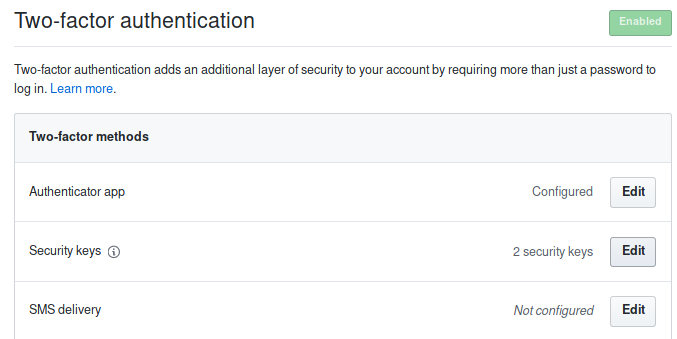
Note the “2 security keys”
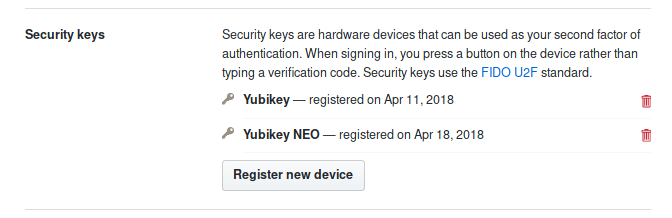
The first one is my YubiKey 4C, and the second one is my NEO.
PAM U2F
You can use your YubiKey’s U2F capabilities with PAM to allow you to log into your machine in a more secure way.
Unfortunately, this don’t really work with SSH except with some modifications on both client and server, so just stick with the GPG public key authentication I’m going to explain below.
Still, it’s cool to set it up on your local machine, and for that I followed James the Bard guide to have it running on my Arch Linux. This should work on any distro with some modifications, given that PAM is default almost everywhere.
Backup: Follow the same procedures on your backup key to have it working in your host.
TOTP
Some versions ago (I don’t know exactly when), YubiKey supported storing TOTP secrets by assigning a OATH-HOTP configuration to one of the slots.
Gladly, this is no longer needed, and new YubiKeys are able to store up to 32 TOTP secrets in a separate storage that doesn’t reside in any of the configuration slots.
Now, this 32 limit may be enough for most people, but it’s not for me. I have LOTS of TOTPs enabled, so what I did is use Authy for storing all TOTPs (with synchronization enabled so I don’t lose them), and only store the important stuff on YubiKey, making sure to also have them on Authy.
When adding a new secret, just scan the QR Code with both Authy and the YubiKey app and you are good to go.
For secrets you had before, if you don’t have a backup of the QR Code or the secret, and you used Authy, you can use this tip or this one to dump the secrets from the Authy chrome extension. I used the later one, and it worked great.
Since I use i3wm, I looked for a way to have this TOTP integrated with my desktop, so I could have my 2FA keys a key combo away, provided my YubiKey was connected. emlun had the same idea, and created yubikey-oath-dmenu, which I use to this day and am very happy with. In i3, I assigned it to the Super+T shortcut (for Token), and made it copy to the clipboard.
bindsym $mod+t exec yubikey-oath-dmenu --clipboard clipboard --notify
For mobile, you can use the Yubico’s Authenticator App, except you need Android to do that. It also works with NFC and USB C versions of YubiKey.
For desktop, you have the yubioath-desktop.
Backup: I found it too tiresome to add keys to the backup YubiKey everytime I added to the primary one, so I just use Authy for the backup here.
PIV
I don’t really use the PIV smartcard applet, opting to use the OpenPGP applet that suits me. But one doesn’t stop you from using the other, and Yubico’s site gives some nice examples of where you could use PIV, for example for OSX Code Signing or Docker Hardware Signing.
Even if not using it, it didn’t feel ok to have it with the default values, so I followed Yubico’s guide to change it’s PIN, PUK and management key using yubico-piv-tool.
yubico-piv-tool -achange-pin -P123456 -NXXXXXX
yubico-piv-tool -achange-puk -P12345678 -NXXXXXXXX
yubico-piv-tool -aset-mgm-key -nXXXXXXXXXXXXXXXXXXXXXXXXXXXXXXXXXXXXXXXXXX
Backup: Follow the same steps just so you don’t have it at the default.
GPG
The OpenPGP smartcard applet is where, in my opinion, YubiKey shines. It allows to a lot of stuff, from the regular file or email signing, to SSH public key authentication and GIT commit signing.
There are a lot of guides on how to set this up, so I’m going to leave a good one here, drduh’s guide, and just point what I did.
I choose to create a 4096 master key and back it up on a secure place (out of my regular .gnupg keychain), and then I uploaded 4096 subkeys to my main YubiKey and 2048 ones to my backup YubiKey.
In a previous version, I mentioned subkeys are directly derived from the master key and that you could use either one and they will validate. This was wrong, so apologies are due. Share your master key public part for daily use.
Backup: As mentioned, just uploading the subkeys to the backup key is enough to have it working anywhere your main keys work.
SSH
For SSH login, after you configured the GPG key, you can run:
gpg2 --export-ssh-key KEY_ID
and you will get an SSH public key that you can just put on any server’s authorized_keys and have it working, provided you have gpg-agent properly configured on your client machine. Next time you login, it’s going to ask for your 6 digit GPG PIN to perform the authentication.
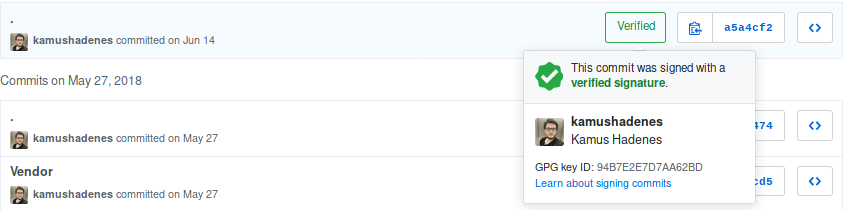
GIT
To have it working on git commits, it’s even simpler. First, you have to enable commit signing with
git config --global commit.gpgsign true
And then you have to specify which key you are going to use to sign the commits with
git config --global user.signingkey KEY_ID
That’s it, you are ready to go. Next time you perform a *git commit, *it’s going to ask you for your GPG PIN (6 digits) and will sign your commit, leaving a nice Verified badge on your commits on GitHub.
GitHub also provides a guide on commit signing that you may want to check out.
Conclusion
That´s how I use my Yubikeys. I found them to be extremely useful and physically resistant, packing a lot of features on an incredibly small device. This is not a paid post, so guess that can give you a feeling of how much I appreciate Yubico’s work on those devices.
Hope you liked it, feel free to reach me if you have any questions.